
[LINK] : See my new post on how to change the automatic belt tensioner.
[ https://chevycobaltblog.blogspot.com/2020/09/chevy-cobalt-how-to-change-automatic.html ]
Chevy Cobalt Belt Change. How to change it. Has several names.
1.) Serpentine Belt
2.) Drive Belt
3.) Fan Belt
SYMPTOMS of a bad old cracked belt.
1.) You hear a squeal. Coming from the glove box.
2.) Your engine belts make a screech or squeal noise usually because the rubber belt is slipping on the metal pulley and just like your tires spinning on the road, this causes noise. The belt may be slipping due to improper tension or because it simply has gotten old and the surface has become glazed, cracked or brittle.
Diagnosis:
1.) I drove my car for a year or a few years hearing this noise on occasion. A 2005 car didn't change it until 2019 with 90k miles on. The squeal is not very loud but noticeable. There is a AC Blower Motor under the passenger dash right where shoes would be at. The noise can only be one of these 2 things. I changed my blower motor since it died.
SPECIAL TOOLS REQUIRED FOR THE JOB:
1.) You need a slim, low profile ratchet. The space between the engine and car body is very tight so you need a slim low profile ratchet. 3/8 drive.

SIDENOTE:
There is a timing chain inside the side of the engine. If it goes bad causes a knocking noise. Not easy to change is a lifetime chain no oil required. There is a bolt in it that can be changed but is same as changing it so do not attempt. Requires taking many things apart and having engine cylinders lined up etc...
HOW TO CHANGE THE SERPENTINE BELT.
STEP ONE:
Raise the car up on the passenger side with a jack and place a jack stand under the car.
STEP TWO:
Remove the passenger side tire. Remove the plastic splash guard... There are a few plastic clips and a few screws, even a screw or plastic piece up under the bumper in the front, you can skip trying to remove that and just let it hang but do it your own way if you want to try to get that screw.
STEP THREE:
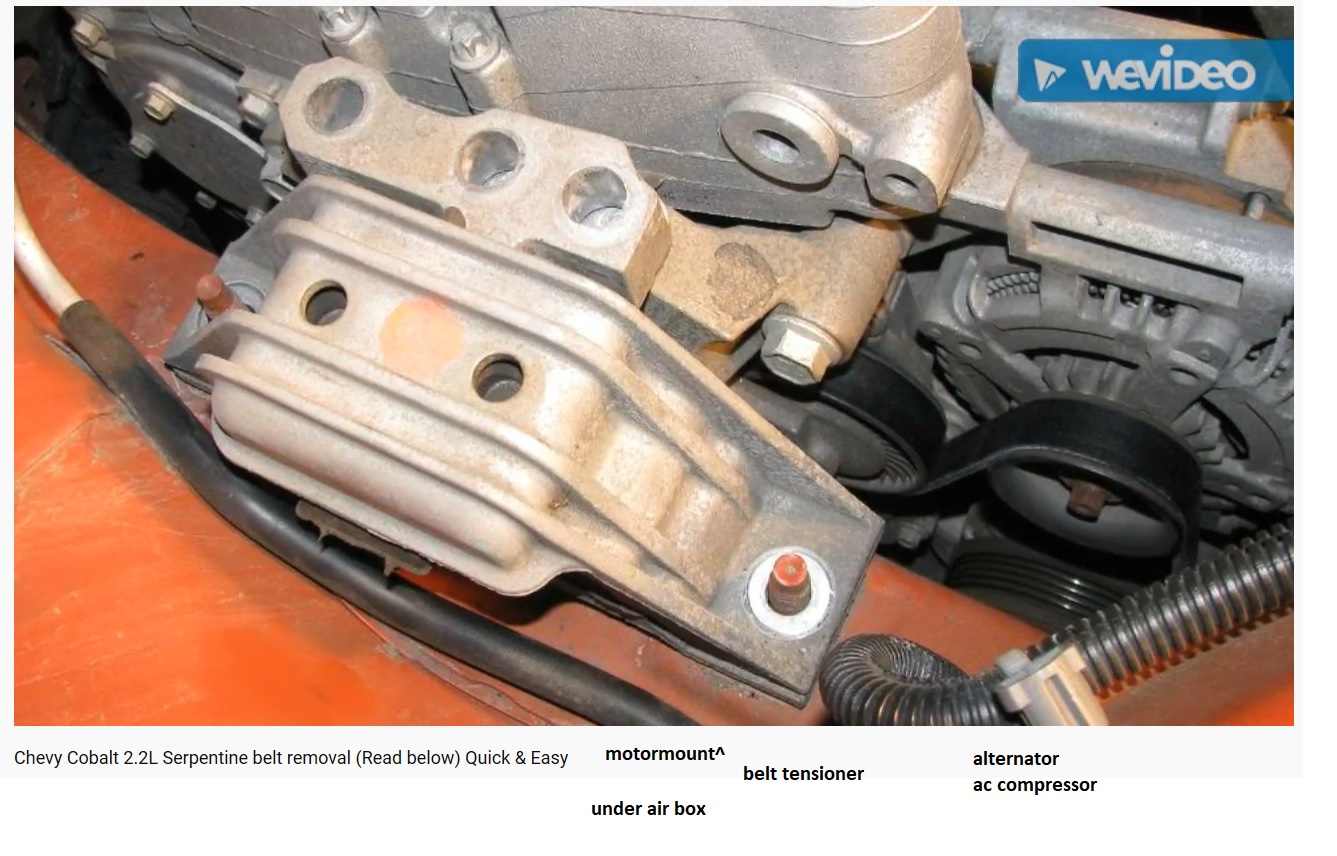
Get yourself a slim wrench. Put the wrench into the automatic belt tensioner square hole in the middle of the tensioner. Turn it slightly counter clockwise keeping the pressure on the wrench and then remove the belt from the 3 pulleys.
A.) The crank is big black wheel pulley.
B.) The AC Compressor is on the bottom and a is large black circle looking thing
C.) The Alternator is on the top and has a groved pulley meaning each side of the circle thing has a deep grove in it.
This Alternator grove is important later for installing your belt.
STEP FOUR:
Buy a new automatic belt tensioner when you replace the belt. Or don't.
STEP FIVE:
Put the new belt up over the Alternator then wrap it over the AC Compressor. Finally get it started on the large black crank wheel coming out of the engine.
Now put that slim wrench back on/in the automatic belt tensioner and again turn it counter clockwise some and raise the belt up over the rest of the crank wheel and then the new belt should slide under the automatic belt tensioner. Be sure everything is properly on the pulleys, making sure the belt didn't fall off the Alternator, and then let go of the wrench.
Will be difficult to see up to check the belt is on everything correctly.
STEP SIX / also STEP ONE^ different step one:
Take off the plastic air housing on the passenger side, take off the engine cover plastic, take off the air tube plastic attached to the engine. Now you can see down where the belt is, so a person can help keep the belt on the pulleys from the top.
This is a good time to clean the throttle body. That is the circle hole square box looking thing attached to the front of the engine you just took the large plastic air tube off. It has a golden plate inside it which likely has black smudge on it. Auto stores sell specific cleaning stuff for it. Wear heavy duty gloves. Don't breath it..
Replace the plastics in the engine bay. Replace the mud splash guard, replace the wheel, lower the car...
OR, or, go pay a shop $200 to do all this^


Step 5 picture.

