So you decided to Change your Automatic Belt Tensioner on a 2005 Chevy Cobalt 2.2L engine, not SS model, which has more stuff running on it and is different than the normal cobalts.
Chevy Cobalt How To : Change Automatic Belt Tensioner


Chevy Cobalt How To : Change Automatic Belt Tensioner
1.) What is the Automatic Belt Tensioner? It is a one piece metal object that is hand sized with a large black spinning wheel and is spring loaded internally.
2.) What does it do? It puts tension on the belt (serpentine belt) and if you hear a noise from the belt it may be the tensioner which lasts about 100k miles I hear. When belt cracks make it so you should change the belt and or also hear noise.
3.) How to diagnose belt problem? Squirt water on the belt and pulleys if noise stops it the tensioner.
4.) What else could it be causing noise? AC Compressor pulley wheel, or Alternator pulley wheel.


CAUTION : WARNING: Do not undo the motor mount without supporting the engine via a wood block and jack under the oil pan or the engine will have no support and fall. The oil pan is the front left (passenger) side up front. The transmission pan is larger, flat and further back located in the middle rear area of the engine bay.
[LINK] : See my prior post on how to change the "belt" and that explains a lot about this job.
[ https://chevycobaltblog.blogspot.com/2020/03/chevy-cobalt-belt-change.html ]
[ https://chevycobaltblog.blogspot.com/2020/03/chevy-cobalt-belt-change.html ]
There are 2 or 3 reasons to remove this motor mount
1.) To change your serpentine/drive belt.
2.) To change your automatic belt tensioner.
3.) To access the drive chain.
I used an O'Reillys slim ratchet and a metal pipe over the ratcher. I didn't use the plastic tube, just had it wanted to test it. If it snapped and that would be painful. You want a 2nd person to help when replacing the automatic belt tensioner, line it up, etc.. and when you tension the tensioner have 2nd person slide belt under the wheel.
Ratchet at about 2 on a clock wheel worked.
Has habit of falling 3,4,5 when not held no pipe on
1.) The automatic belt tensioner is held in place with a long 15mm ended bolt.
2.) To remove it you need to turn it left, counter clockwise, using a 15mm wrench.
3.) The alternative is to use a 15mm socket, on a long extension rod.
4.) The problem is that the engine sits lower than the bolt hole allows for you to get a socket onto the bolt and turns it free, might depend on your specific socket set, but there is basically zero room to unscrew the bolt before the socket is stuck between the cars frame brace bar and the bolt in the tensioner,
So to get access to the bolt, you need to put a block of wood under the oil pan which is on the front left side, passenger side, (not transmission pan) which is larger, flat and more in the middle closer to the driver side.
Put a jack under a block of wood and jack it up an inch then you can put the socket through the hole and unscrew it that way. If you don't want to do that try to do it with a wrench it can be done but the problem you will encounter, (since you have already removed the motor mount, just jack it up some more,) the problem you will encounter is trying to line up the tensioner and get the bolt to go into the bolt hole. The bolt can already be on the tensioner when you try to mount the tensioner to the hole, there is a small circle at the top of the back of the tensioner, and a small hole on the engine where that hole meets with the other to lock it in place,
the problem is unless you have 10 foot arms and 4 of them you can't be below the car lining things up and holding the tensioner up right and working the bolt, it all fighting you wanting to fall down and you might sit there spinning the bolt forever until you realize it isn't in the hole at all, or cross threading it.
So have a 2nd person put a hand on the tensioner, I raised the engine sockets the bolt in after trying to wrench it and not raising the engine became to much to deal with.


To take off this plastic in the engine bay of the chevy cobalt:
HEAT SHIELD:
1 : 1) Unscrew oil cap, set aside.
1a.: 2) Remove the large plastic cover from the engine. Replace oil cap. The main plastic cover (heat shield) has 2 deep cones; one on the left rear and one on the front right-side on lower left side next to the dip stick. The entire piece is held in place by sliding those cones over a metal post attached to the engine. When replacing be sure you line it up correctly because it will all appear to be back on tight but the cones might not be over the rods. The oil cap also holds it down on the engine so if you can't get the cap on its not mounted correctly.
AIR BOX part 1 of 2 and or AIR TUBE:
2 : 3) There is a screw end on a long shaft in the middle area of the engine, on the front side under that black plastic (air tube) thing with 3 lines on top of it. Loosen that screw
2a : 4) Loosen the screw on the metal ring on the left side of the tube.
2b : 5) Disconnect the black (Mass Airflow Sensor) plug from the tube housing.
2c : 6) Disconnect the small tube via squeezing the metal clip ring and sliding off the tube from the engine. (forget what this called it is an airflow tube, circulator)
2d : 7) Remove the plastic clip near the engine in the front middle area of the engine, near the step 3 screw but higher, this plastic thing has a flat top and is holding the plastic to the engine via small circle hole that thing is sitting on. You need to get a flat head screw driver, and slide it under the cap to raise the flat cap up and then remove the entire piece. Is a long plastic shaft about half size of a pencil long when removed.
2e : 8) Pull the entire plastic air box thing away from the engine, up and back works, it will slide off of the intake manifold (circle hole that it wraps around on the front of the engine the air enters through.
AIR BOX part 2 of 2 and or AIR TUBE and or AIR FILTER HOUSING:
3 : 9) Unscrew the two screws on the left side air box (air filter housing)
3a : 10) With a "Hex 30 or 50" forget which, it is a star looking screw driver bit, unscrew the lower part of the air box from the car. This screw is on the only single lower support arm of the air box filter housing. It is a tight fit to reach no long screw drivers can fit need a short one.
3b : 11) Lift off the air box, filter housing.
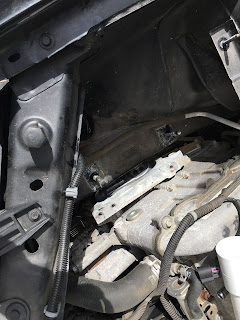
Now you can see what is in the 2 above pictures. The motor mount, then the motor mount removed.

You are going to want a person to help you replace the automatic belt tensioner as it is very tight to reach up between the engine and the car frame and you need to get the bolt in and you need to get it lined up with this hole and circle on the back of the tensioner.
Trying to coordinate the task is nearly impossible to do alone unless you have very long series of extensions to reach the bolt through the hole in the car wheel well, with your left hand, and to get the bolt going while leaning over and keeping the tensioner on correctly with your right hand.
Its just better to have a person help and also for getting the belt back on. As it is such a tight space pushing the tensioner back and also sliding the belt under the tensioner is again nearly impossible.
Good luck. Is easier with the correct tools.
You will want a second person to help guide the belt on.
You will want a second person to help guide the belt on.


a video what it sounded like exists. Sounds very loud and bad. A screeching.