Chevy Cobalt Airbox tube modification
So you decided to modify your airbox tube. This is an easy thing to do with 1 special tool (T50 Hex Screw Driver Bit) and is very annoying to get the new tube mod onto the plastic airbox tube.


1.) Now unscrew (untighten) the throttle body plastic bolt with a flat head screw driver on the right side of the intake air cover plastic. The bolt screw head is located on a long metal rod that is very noticeable because it is very long and is down some in the engine compartment on the right side of the plastic. You can also use a socket for this unsure what size 7mm maybe?

2.) Unscrew the metal ring on the other end of the tube. It has a metal screw built into it. Just loosen it enough. Un-attach the air tube from the airbox in the far left by just pulling it off the circle plastic airbox housing letting it rest in place once loose.
2A.) There is the PCV tube that needs to be disconnected. Use a pair of pliers to squeeze the clip together and move it back onto the tube so you can free the tube from either the engine or the plastic housing.

2B.) There is a flat black plastic retainer clip on the right side of the plastic attaching it to the engine. Use a flat head screw driver to lift the top portion of the retainer up and then use your fingers to pull the top cap you just loosened upwards a good deal, is a long plastic peg and when you pull it up high enough you can lift the entire retainer peg out. You probably should put it back after the next step. It's one of those extra parts you find when you're done and have no idea where it came from.


3.) Lift the air intake plastic off the engine by pulling in the middle of the engine up and back towards you, meaning you are pulling the top of it towards you while the bottom tilts in towards the engine with a slight twisting motion when it is moving to aid in freeing it from the throttle body metal circle. It sits on the engine the same way the tube on the left is by sliding over so you are sliding it off what it is on, which is the air intake "throttle body".

[side note, you can clean the throttle body since it is there. Remove the dirty oil blackness on it with a can of throttle body cleaner. get heavy gloves and follow instructions on not touching the plate really. Will slice off your finger so disconnect the battery and or just remove the throttle body entirely.]
4.) Unscrew the back 2 screws on the left airbox filter housing with a 10mm socket. keep them around and when you lift the box off put them back on the posts.


4.1) Un-attach the MAF sensor plug. You push on the back of it so that it raises up releasing itself from a plastic tab inside. You don't push down on the front of it or stick a screw driver in it to wiggle it out, you have to tetter tottor the back of it. like a flip switch forward is on back is off, you have to press the back.

5.) THE HARD PART special tool required. You need a T50 Hex screw driver head which looks like a 6 sided star, or an allen wrench with 6 sides but the allen wrench will be flat while the T50 is a jagged star, the allen just happens to work also is a T50 intended though, is a pretty small allen wrench about size of pinky finger and very slim. DO NOT DROP THE T50! you will... unscrew the lower screw in the long black arm extension of the box attaching the box to the frame of the car. You need to lean over the front of the car and look back towards the front to see it under the front support metal arm of the car body.


6.) The air filter housing box plastic now lifts off. Lift it up off the 2 long screw pegs in the back.
You can pop it open and check to see if you need a new air filter by undoing the 2 metal clasps on the side of the box. Notice the way it closes requires some technique since it is an interlocking plastic tabs type of design. No reason to notice it now but if it was left in and you wanted to open it to see filter life be tricky closing it again. I know. It doesn't just lift up it also slides some which is difficult to do when it is attached to the car.
7.) Get a pair of clippers, snips, drill with a cutting wheel on it, whatever and a heavy duty razor blade and cut a line in the plastic that runs next to the tube, you are making room for the new plastic tube to be able to slide up the airbox tube. Make it about halfway up and as thick as the new tube. However you can with your tool set.
 You can see in this picture above how much I had to cut back into the plastic on the right side. After I cut it with some snips, I used the razor blade to clean up the remaining plastic by shaving it off with the blade. Did that by pushing away from me towards the airbox slice by slice until it was flat as the tube.
8.) Next, so now the annoying part. Take the new plastic tube and try to fit it onto the airbox tube which is a bit difficult to do alone. I used big screw drivers and a hammer. The airbox tube is lop sided which doesn't really help. Push as far back as you can until the indent concave design of the new tube just about reaches the opening at the end of the airbox tube.
Now cut off the remainder of the new tube after it starts to dip inwards. You want enough so that the upper airbox tube can mate with the lower air resonator tube and this all depends on how far back you placed the new tube and how much you cut off the end. So anyway, now use the razor blade again to cut the new tube mod to your requirement. Now reinstall. Hope it fits and just locks into place. Start the reinstall by putting the airbox over the 2 rear screw pegs and then line up the new tube end and press down, is it mates your done. If not? Cut some more? (I had the advantage of not having my front bumper on and was able to take the air resonator off to make this work right, still my cutting was a shot in the dark really.)
 The red tube I used has very skinny lines in it going all the way around so I didn't need to masking tape the thing to make a straight cut I just followed the line and used the razor blade slicing it.
It should sort of have a pop on feeling, a slide on, in place feeling and a tiny amount of resistance when you reinstall the airbox. I pulled off the excess old foam around the air box resonator tube as well but I likely could have left it alone.


When you put that T50 hex bolt screw back in the front don't drop the T50. You will. The trick to the screw bolt there is that it sits in a rubber housing. Its all one piece, there is a o-ring on the bottom, a rubber wall inside the plastic arm, and then an arrow head shape rubber at the top with a hole through the entire thing that the screw bolt with a washer sits in. You have to have the bolt all the way down in it, if the bolt is slightly elevated (from all your test fitting knocking it up out of the rubber) just hit it with a hammer. You can literally hit it through the rubber from the bottom o-ring side.


So you decided to modify your airbox tube. This is an easy thing to do with 1 special tool (T50 Hex Screw Driver Bit) and is very annoying to get the new tube mod onto the plastic airbox tube.


First you need to remove the engine cover plastic so that you can remove the airbox plastics. So take the oil cap off first and set it aside, then lift the cover off, it attaches on a metal peg next to the dip stick and in the back left passenger side with another peg. (It is a cup and peg design that sort of snaps into place when you replace it but it is possible to replace it and not be on the peg with the cup so I line up the dipstick peg and cup first.) Replace the oil filler cap.


1.) Now unscrew (untighten) the throttle body plastic bolt with a flat head screw driver on the right side of the intake air cover plastic. The bolt screw head is located on a long metal rod that is very noticeable because it is very long and is down some in the engine compartment on the right side of the plastic. You can also use a socket for this unsure what size 7mm maybe?

2.) Unscrew the metal ring on the other end of the tube. It has a metal screw built into it. Just loosen it enough. Un-attach the air tube from the airbox in the far left by just pulling it off the circle plastic airbox housing letting it rest in place once loose.
2A.) There is the PCV tube that needs to be disconnected. Use a pair of pliers to squeeze the clip together and move it back onto the tube so you can free the tube from either the engine or the plastic housing.

2B.) There is a flat black plastic retainer clip on the right side of the plastic attaching it to the engine. Use a flat head screw driver to lift the top portion of the retainer up and then use your fingers to pull the top cap you just loosened upwards a good deal, is a long plastic peg and when you pull it up high enough you can lift the entire retainer peg out. You probably should put it back after the next step. It's one of those extra parts you find when you're done and have no idea where it came from.


3.) Lift the air intake plastic off the engine by pulling in the middle of the engine up and back towards you, meaning you are pulling the top of it towards you while the bottom tilts in towards the engine with a slight twisting motion when it is moving to aid in freeing it from the throttle body metal circle. It sits on the engine the same way the tube on the left is by sliding over so you are sliding it off what it is on, which is the air intake "throttle body".

[side note, you can clean the throttle body since it is there. Remove the dirty oil blackness on it with a can of throttle body cleaner. get heavy gloves and follow instructions on not touching the plate really. Will slice off your finger so disconnect the battery and or just remove the throttle body entirely.]
4.) Unscrew the back 2 screws on the left airbox filter housing with a 10mm socket. keep them around and when you lift the box off put them back on the posts.


5.) THE HARD PART special tool required. You need a T50 Hex screw driver head which looks like a 6 sided star, or an allen wrench with 6 sides but the allen wrench will be flat while the T50 is a jagged star, the allen just happens to work also is a T50 intended though, is a pretty small allen wrench about size of pinky finger and very slim. DO NOT DROP THE T50! you will... unscrew the lower screw in the long black arm extension of the box attaching the box to the frame of the car. You need to lean over the front of the car and look back towards the front to see it under the front support metal arm of the car body.


6.) The air filter housing box plastic now lifts off. Lift it up off the 2 long screw pegs in the back.
You can pop it open and check to see if you need a new air filter by undoing the 2 metal clasps on the side of the box. Notice the way it closes requires some technique since it is an interlocking plastic tabs type of design. No reason to notice it now but if it was left in and you wanted to open it to see filter life be tricky closing it again. I know. It doesn't just lift up it also slides some which is difficult to do when it is attached to the car.
7.) Get a pair of clippers, snips, drill with a cutting wheel on it, whatever and a heavy duty razor blade and cut a line in the plastic that runs next to the tube, you are making room for the new plastic tube to be able to slide up the airbox tube. Make it about halfway up and as thick as the new tube. However you can with your tool set.

8.) Next, so now the annoying part. Take the new plastic tube and try to fit it onto the airbox tube which is a bit difficult to do alone. I used big screw drivers and a hammer. The airbox tube is lop sided which doesn't really help. Push as far back as you can until the indent concave design of the new tube just about reaches the opening at the end of the airbox tube.
Now cut off the remainder of the new tube after it starts to dip inwards. You want enough so that the upper airbox tube can mate with the lower air resonator tube and this all depends on how far back you placed the new tube and how much you cut off the end. So anyway, now use the razor blade again to cut the new tube mod to your requirement. Now reinstall. Hope it fits and just locks into place. Start the reinstall by putting the airbox over the 2 rear screw pegs and then line up the new tube end and press down, is it mates your done. If not? Cut some more? (I had the advantage of not having my front bumper on and was able to take the air resonator off to make this work right, still my cutting was a shot in the dark really.)

It should sort of have a pop on feeling, a slide on, in place feeling and a tiny amount of resistance when you reinstall the airbox. I pulled off the excess old foam around the air box resonator tube as well but I likely could have left it alone.


You can't really see more than this much of the mod installed even when the airbox is off during the install. There is no room on the side to push it down further or wrap it with duct tape so whatever you have done to make your fit on the tube it will be that way until you pull the entire thing up and out again no real room to be pushing on it to make it go down further. That being said if you manage to get the new tube on the plastic airbox tube a far enough distance you can use vice grips to pull it down some. You need it to be right at the groove because like I said there is just no room in the engine compartment to be trying to push and mate the top and bottom tubes together, either you cut the end wide enough or it isn't wide enough. In my experience.

I know it looks like it isn't making a seal but the top tube is open ended (slanted though) and the bottom has an arrow shaped taper at the end. When the top is mounted it slides over the bottom tubes taper. The problem was that the foam deteriorated and so there was a gap from that missing foam or warped foam. So now the top seats and the bottom slides in and the new plastic tube is just a band aid over it all.


My coupler reducer has a indented taper to it not just a flat circle like this one. See the second top picture for exact details on size dimensions. Or I will just tell you it is 4mm thickness, 3-ply nylon, 2.75 inches to 3.25 inches intake piping.

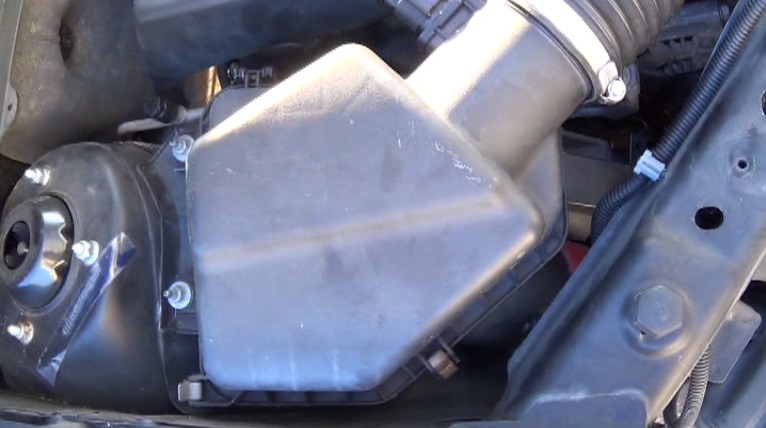
This is the best picture I could find of the slanted down air inlet tube from the air filter housing plastic box. In the last 2 pictures you can see the air box arm that the T50 Hex bolt attaches to but the air box in the picture has no rubber grommet or bolt.


------------------------------
An alternative to the nylon coupler reducer I used is to use a plastic connection tube like on the top.

You will still need to cut the air box down tube and the air resonator top side tube somehow. To be able to get to the air resonator you have to remove the front bumper. Then there is 1 bolt head on the right and 1 plastic retainer on the left... this picture doesn't show. But it is very easy to remove it once the bumper is off.


Now that I have done the nylon mod I think the plastic air tube way would have been even better. Like I said the nylon tube acts as a band aid between the 2 air tubes, ports. While it seats good enough now, having to cut the down tube for either mod makes it seem like a screw tight mod would be more appropriate. The size you want is likely not 3.25 inches wide and 2 sets of screw clamps. You likely want 3.5 inches for the top since it was so difficult to get this coupler on at 3.25 inches and the 2.75 inches I got to fit over the bottom air resonator tube but I need to go measure it to be sure what size the up tube is.
You must be wondering. Did the small end of the tube fit into the inside of the plastic tubes and the lower air resonator tube and the answer is yes. I could have made it go that way but then there would a constriction in the system and I didn't want that. The red tube would go inside the lower and then the upper tube would need to be cut so you press it into the larger end. This was a problematic idea because there is not much space to be pressing down the air box and doing so would have wasted the coupler if it didn't work.